Migrating Your TeamCity Coverage From NCover 3
Covering Your Build
Then
Build server integration with NCover 3 meant adding a call to NCover Console to your build script with a task or exec telling NCover to profile your test runner and gather the coverage data.
Now
Now, the NCover Service monitors test runners without interfering with these processes at all. As our lead developer likes to put it, "NCover stays out of the way."
The key to profiling any build with NCover is in profiling the right process.
If you're running MSTest in your Sonar build, then you set up an NCover project to monitor qtagent. If you're running NUnit, you set up a project to monitor nunit-agent.
The build platform isn't as important as the process that's running your unit tests.
Configuring Team City
Before NCover can profile the integrated NUnit runner, you should modify the Team City environment.
You can still run nunit-console from your build script if you prefer, but making some simple changes to the the TeamCity TestRunner config will allow NCover 4 to profile the integrated NUnit runner without changing your test process.
In the TeamCity project where you want NC4 to profile NUnit, go to Configuration Step 6: Build Parameters:
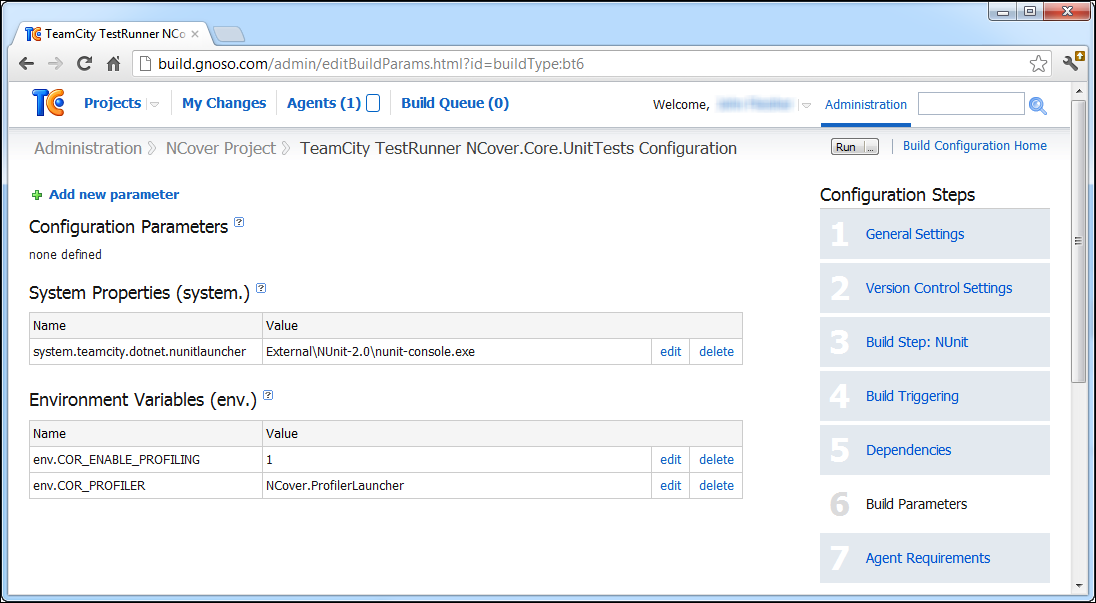
Set the System Property as appropriate for your build. If you're using the TeamCity test runner, you have probably already configured that setting to look something like the following:

For NCover to detect the NUnit tests when they are executed by the build task, the build agent environment needs to be configured to enable NCover profiling.
This is easily done by adding two profiling environment variables:

These changes will enable NCover to detect the TeamCity process that runs your unit tests. Depending on your test configuration, that exe will be some variation of "JetBrains.TeamCity.PlatformProcessRunner.v4.0.msil.exe". If your tests are designed for the v2 CLR, you'll need to watch for the v2 exe.
Once you've modified the environment variables for the build as described above, you can create an NCover 4 project to collect your unit test coverage.
Creating a Code Central Project
From the Home view of the Code Central, click Add New to open the "Create a New Project" window.
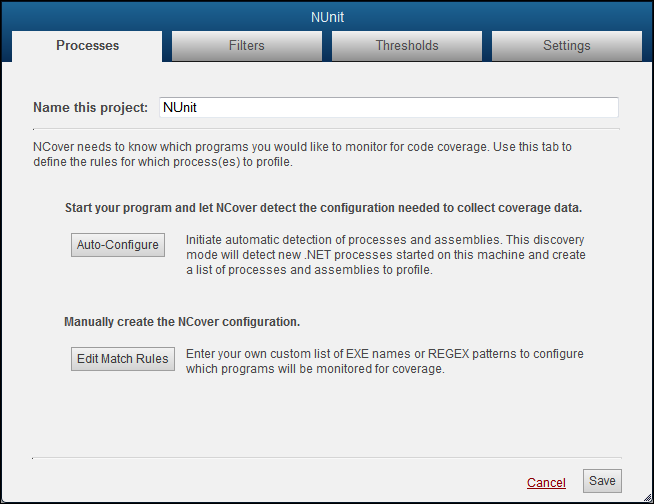
Match Rules
Note: If you're setting up coverage for a process running locally on the machine where Code Central is installed, you can let Auto-Configure see next step below) create project settings for you.
If you're setting up a project for a remote Collector, then keep following these steps.
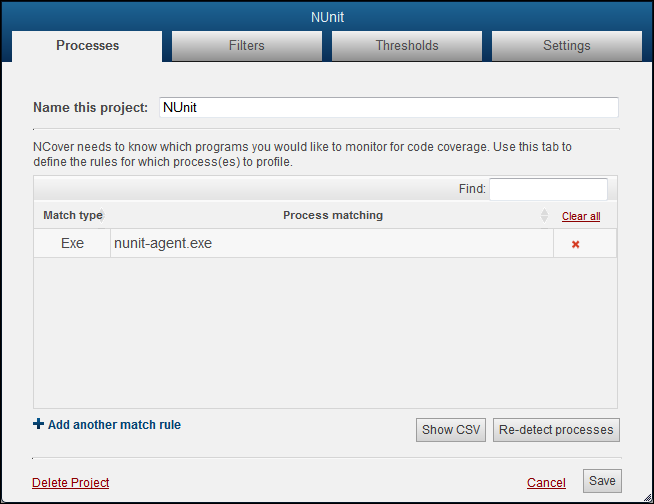
From the "Processes" tab, name the project and then click on "Edit Match Rules" to specify the test runner you want to monitor.
The two match type options are Regex and Exe.
Let's say you want to monitor NUnit tests. Regex is a good choice in this case. The Regex option would be simply "nunit-agent", since the regex isn't case-sensitive. This regex pattern would match both "nunit-agent.exe","nunit-agent-x86.exe," etc.
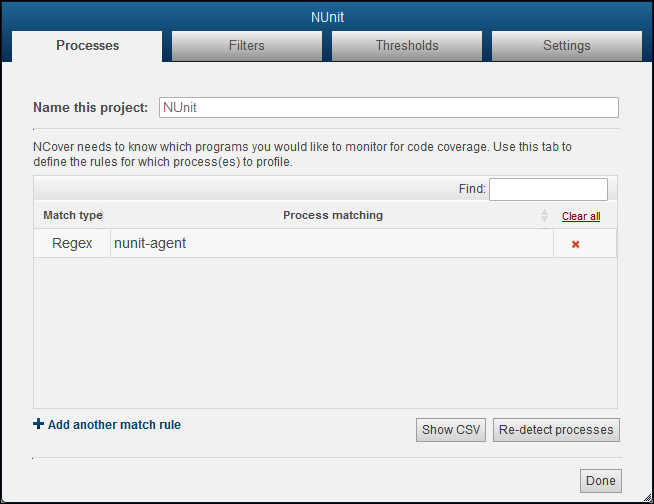
The Exe option tells the NCover profiler to match on the executable name.
You can also use a file path if you want to profile a process only when it runs from a specific location.
Auto-Configure
Another option is to click on the Auto-Configure button and let NCover create match rules for you.
The Processes tab will switch to the Auto-Detection view and start monitoring for .NET processes as soon as you click on Auto-Configure.
Start the test runner, and the executables and assemblies that are being loaded during your testing will display in the detection window.
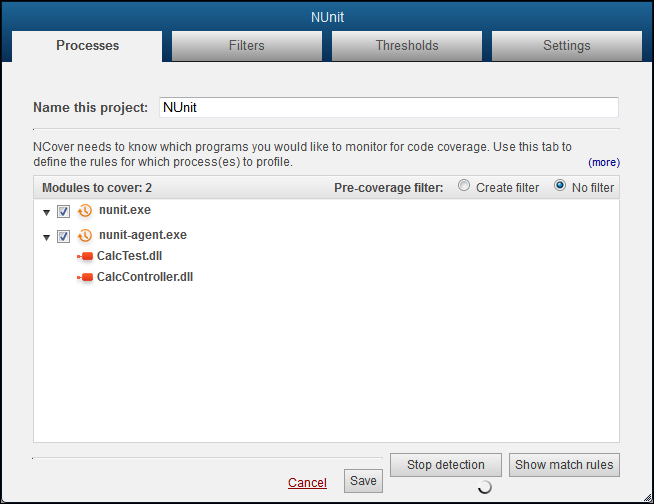
Switch the Pre-Coverage filter radio button to "Create filter" to review the "Modules to cover" and decide whether to include or exclude modules from the list.
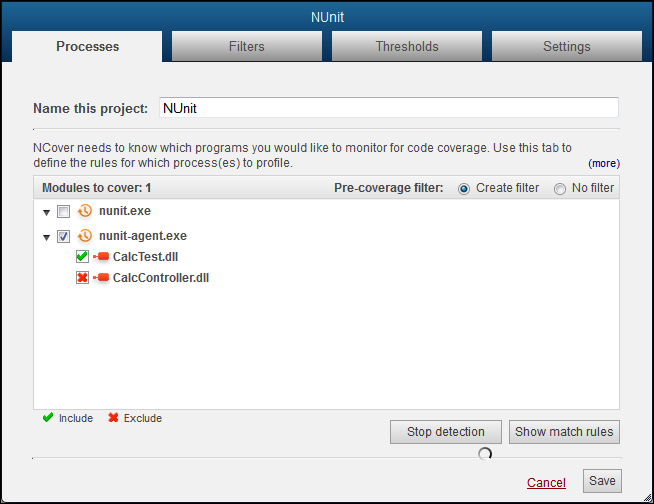
Review the list and uncheck any items that shouldn't be covered. For example, you may want to include the nunit-agent.exe., but not the nunit.exe (the GUI).
Click the checkbox beside each module once to mark with an X to exclude the module. Click twice to mark with a check to include the module.
Note: You can specifically exclude modules by placing an X beside them on this screen, but any modules that are not specifically included will not be profiled, anyway. In other words, not creating an include is functionally the same as creating an exclude rule.

The selections shown above create the filter rules seen below when you click on the Filters tab.
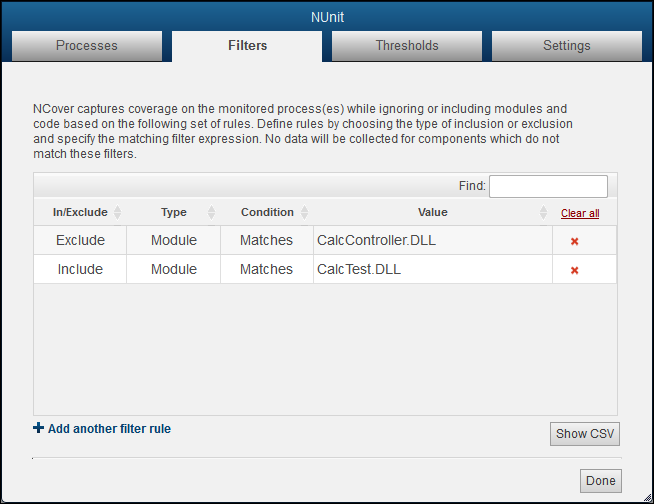
Go the "Processes" tab and click Save to accept these selections, or Re-detect processes to start over.
Collecting Coverage Locally
Note: When your project selections are completed, re-start your test runner and run your unit tests.
Go to the Home page and you'll see that the light beside your enabled project is pulsing green to indicate coverage is being collected.

Immediately to the right of your project name, the Modules Collecting counter displays the number of modules being profiled in the current execution of your project.
When your NUnit tests are complete, close your test runner to stop profiling and allow Desktop to collect coverage data. When the data is aggregated, the results will be automatically displayed below your project on the Project view.

Collecting Coverage Remotely
Once you've installed a Collector on your build server to profile your tests, connect it to Code Central and it will automatically pull down project settings from Code Central.
Since it's likely that you have more than one project on your build server that uses NUnit, having a Code Central project set up to simply monitor the Nunit agent would gather a confusing variety of data on unrelated projects.
The Run command allows NCover to:
-- Collect coverage on the process specified in the command line.
-- Write the coverage data to the specified project.
-- Give each execution the specified build ID.
Read more about the Run command in the feature reference and on the NCover blog at http://blog.ncover.com/the-ncover-run-command/
The next time the process -- in this example, NUnit -- you've defined in the Code Central project is run on a QA machine, developer's desktop, or a build server, Collector will automatically gather coverage and send it to Code Central, where you can view and analyze the coverage results.